The Story
When you’re in the building stage of a new RES Workspace Manager environment you have to test new settings and new applications very often. Sometimes you can be a little too fast with the Refresh Workspace action. The cache on your test client has not updated yet so when you’re testing the modifications it can seem like it’s not working. The only way to be sure is to force a cache update from the console. I find it annoying to have to leave the section I’m modifying in order to update the clients cache and then go back again, especially if it happens a few dozen times a day! Would’t it be great if we could force a cache update from the client with the click of a mouse button? Unfortunately there’s no command line option to force a cache update like there is for Refresh Workspace. I’ve requested this feature in RES Uservoice a while ago but there aren’t enough votes yet (help!).
Impatient as I am I started to poke around and I’ve come up with a way to create an application to force the local cache from the client using a Powershell script. Here’s how I did it (you’ll find a care package at the end of the blog 😉 ):
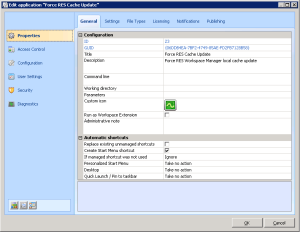
First I created an application without a command line. It looks like this:
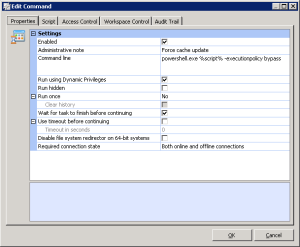
Then I added an Execute Command action to the Actions tab in Configuration with the following settings:
Note that the powershell command has to be run with the -executionpolicy Bypass parameter in order to run properly. We need to check Dynamic Priviliges since the script involves hacking the HKLM registry and we need to check Wait for task to finish… because we’ll add a second command later (also if you check Dynamic Privileges the script won’t run properly without the Wait option checked).
The Script
Now on to the script itself. The trick is to understand the cache update process. There is a specific registry value that the Workspace Manager agent checks to see if it has the latest cache version. This is determined by checking the GUID in the data of this registry value and comparing that with the GUID in the Datastore. How often the value is checked depends on your agent settings in the Workspace Manager console. However, if we delete that registry value the agent is triggered immediately, updates the cache and restores the registry value with the new GUID data!
The registry value in question is named Global and it resides in the following registry keys:
- HKLM\SOFTWARE\RES\Workspace Manager\UpdateGUIDs (for x86 clients)
- HKLM\SOFTWARE\Wow6432Node\RES\Workspace Manager\UpdateGUIDs (for x64 clients)
So the script will begin by letting the user now what’s going on and then determine which path os needed for the client. There are many ways to do that but I like to use the PROCESSOR_ARCHITECTURE environment variable. That’s what it’s there for, right?
Write-Host 'Forcing a local cache update for Workspace Manager.'
 Write-Host ''

# Set registry path for 32bit and 64bit clients

If ($env:PROCESSOR_ARCHITECTURE -eq 'AMD64') {
      $path = 'HKLM:\SOFTWARE\Wow6432Node\RES\Workspace Manager\UpdateGUIDs'
 }
 else {
       $path = 'HKLM:\SOFTWARE\RES\Workspace Manager\UpdateGUIDs'
 }
Then we need to delete the Global registry value:
Remove-Itemproperty -path $path -name Global
Now we need to wait until the Global registry value is restored, so we know that the update is complete. For this I used a I Do – Until loop:
$result = $null
 Do {
     Write-Host '.' -NoNewline
     $result = Get-Itemproperty -path $path -name Global -ErrorAction SilentlyContinue
     Sleep -Milliseconds 50
 } Until ($result -ne $null)
 Write-Host ''
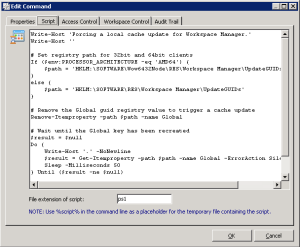
Don’t forget to enter ps1 as the scripts file extension:
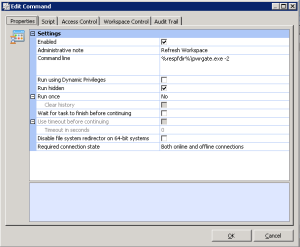
And there we have it! The cache has been renewed! Now we just have to refresh the workspace. For this I created a second Execute Command action that looks like this:
All done!
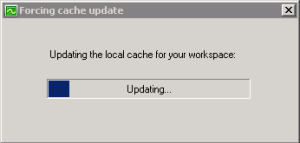
That’s all there is to it! Now you can update the local cache from within your clients workspace. No more going back and forth in the RES Workspace Manager Console! I also wrapped this script in a nice GUI executable with a little help from our friends at Sapien. Basically, it just shows a messagebox with a marquee style progressbar. The advantage of the executable is that it looks nifty and there’s no console. Here’s what that looks like on a 2008 R2 server:
I realize everyone who reads this must be wondering: Can I just get a Building Block of this marble? The answer is: Yes you can! If you prefer the script method I described it’s available right here. If you want the executable you can get it here. Just place the exe in the Custom Resources folder and create the application. Don’t forget to add Administrative rights to the application.
Hopefully you’ve found this useful. Feel free to comment on this blog, it’ll be appreciated.
13-11-2017 : I’ve create a RES Hub package for this solution. Here’s the link: RESHub


thanks ! awesome.
You’re welcome.
Link for the exe appears to be broken. Would you be willing to repost it or email it to me?
It works on my end. Perhaps your company is blocking dropbox links. Try this one: https://drive.google.com/file/d/0B5XLylyeMINiOU9WWmpXX0FmWW8/view?usp=sharing
Thanks! I tried to execute the EXE in an x86 Win7 View desktop, logged in as an admin, and it threw the following error – “The version of this file is not compatible with the version of Windows you’re running.” Any idea why it would say that?
Hi Darren. I made that executable a while back so I’ll need some time to check. I’ll get back to you on this.
Pingback: Application Cache Update Failed | Free Documents App
Thanks for the great article! Although is a bit older is still applies and helped me out!
Glad I could help.